Wednesday, June 12, 2013

June 10, 2013 - Yellow Layer Cake with Rich Vanilla Buttercream Frosting

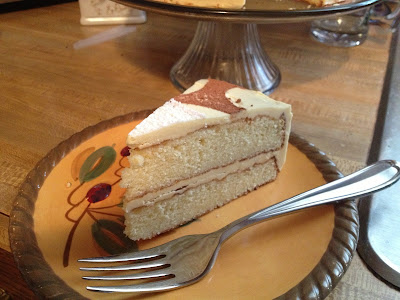
After a weekend of camping (yes the pup went along and had a great time), I was ready to bake something, and once again I really felt like making a cake.  However, I didn't really want to try a new cake recipe, so I decided I could satisfy my urge by making the Yellow Layer Cake again, but just use a different icing, and this would still check a recipe off the list.  I went for Rich Vanilla Buttercream Frosting, and even went as far as to get a little fancier with the decorating.

 
The cake itself turned out great once again, and while it was cooling I started work on the buttercream.  I had made the Rich Coffee Buttercream the first time I made this cake, and the Vanilla variety was very similar, just substituting vanilla extract for the instant espresso.


The result was an extremely buttery, and smooth frosting.  However, when the cake was done and frosted, I felt like I should try and branch out a bit with my decorating.  Lucky for me the book has a couple pages on types of decorating to do, so I settled on the alternate cocoa powder and confectioners' sugar circles.


Once the icing had set in the fridge for a while, I got about six jar lids of varying sizes and arranged them on top.  Then, dusted with the cocoa powder.  The lids were rearranged and I dusted with the sugar.  The end result, I thought, was really cool looking, and definitely added an extra level of coolness to the cake.
 
 
But of course, to the part that matters most...the taste.  It was great once again.  The cake was as good as the first time, and the vanilla buttercream literally melted on the tongue.  Add in a hint of the cocoa and sugar from the top, and this cake was definitely a winner with the family!

June 4, 2013 - Flourless Chocolate Cake

I had a hankering for something chocolately, and I was in the mood to make a cake.  I flipped through the book and found the recipe for Flourless Chocolate Cake.  Even though it was a cake that required sitting in the fridge overnight, I decided to make it anyways.


The amazing thing about this recipe was the small number of ingredients it required, literally eggs, butter, and a lot of chocolate!  However, even with the few ingredients required, it was a somewhat intense process of beating the heck out of the eggs, melting the chocolate and butter together, and then folding the two components together in sort of layers.


Then, the cake is baked in a foil wrapped spring form pan in a water bath.  Once the cake cooked(very similar to a cheesecake in process from this point on), it then cooled to room temperature and then went wrapped into the fridge overnight.  The next day, once I was ready to have a taste, I took the sides of the pan off and put the cake on a serving platter, cut a slice, and dusted with confectioners' sugar.

 
This cake was fantastic.  Although I do agree with the book, in the sense that they say that calling this a cake is really a stretch.  It was dense, moist, fudgy, and completely loaded with a great flavor of chocolate.  This recipe was definitely a winner, and the next time I make it (because I can assure you it will happen again), I would like to try it with either a coffee or nut flavor liqueur to try something different.  But for now, this was perfect on it's own.

June 1, 2013 - All-Season Blueberry Cobbler

My parents were making dinner for my family and one aunt and uncle, so I volunteered to make a dessert (of course).  I had a lot of blueberries, so it was a toss up between blueberry pie and cobbler.  I settled on the cobbler (mostly due to time reasons), and since I was using frozen blueberries, I went for the All-Season Blueberry Cobbler recipe (since this recipe makes some modifications/additions due to the blueberries being thawed).


This was actually my first recipe from the "Crisps, Cobblers, and Other Fruit Desserts" chapter, but I was surprised at the simplicity of the recipe.  Basically, it consisted of mixing up the blueberry filling, baking it in a pie dish for a bit, then scooping a biscuit dough on top of the hot berries and baking it again.


Once the blueberry filling was in the oven, it was time to mix up the biscuits.  The kicker with the biscuits is to not mix the wet and dry ingredients together until just before the berries come out of the oven.  With about a minute left, I mixed up the biscuits, then scooped out the dough onto the hot berries.


The cobbler baked then cooled.  The biscuits were a perfect golden brown, and the thing I love about this recipe is the simplicity.  The berries really stand out due to the fact that there are few other components, but the biscuits are the perfect compliment.  Now if you really want to get crazy, my dad also made homemade vanilla ice cream that night, so obviously some of the family was all over a scoop of that on top of this cobbler.  However it was eaten, it was definitely a success!

May 30, 2013 - Cranberry-Orange Scones

So two days after my first scone success I was ready to tackle another variation.  I just so happened to have orange flavored dried cranberries (I know, random thing to have in your pantry), but they were perfect for the Cranberry-Orange Scones variation of Cream Scones.


Since the process was almost identical for these, I won't take too much time on this post (as I am still getting caught up!).  The only thing I will say is that the dough this time around was much easier to work with, mostly because I wasn't so concerned with smashing the blueberries during the kneading and mixing process.


Once again, the scones were a success.  Same flaky, buiscuity texture and density, but the orange flavored cranberries really added a great flavor.  I will definitely be looking forward to trying the remaining four variations of this recipe!

May 29, 2013 - Lattice-Top Cherry Pie

So I had a request this day for a cherry pie.  I had officially never made a pie that consisted of a dough shell, let alone one that had a lattice top, AND not to mention I had made a grand total of 1 pie in my life (the Chocolate Cream Pie, which I must admit did turn out great!).  Considering all this though, I was up for the challenge and said yes.


I read through the process for making the Pie Dough for Lattice-Top Pie first, then read through how to actually assemble the pie to make sure I understood everything, including the timing, before I jumped right in.  I started with the dough and mixed that up and got it in the fridge to chill for a while.  After that, it was time to assemble the lattice.


The lattice process included rolling out a large rectangle, cutting it into strips, freezing the strips, then assembling the strips into the lattice.  This was quite a process, but I must admit I was pretty proud of how my first attempt ever came out (only one tear!).  After the lattice was done and back in the freezer, I rolled out the other piece of dough and fitted that into the pie dish, then into the fridge that went.  While those to components chilled, I mixed up the cherry filling.
 
 
I actually used frozen fresh cherries that had been thawed, and they worked out great.  After the cherry filling was mixed up it went into the pie shell.
 
 
Then on the top went the lattice top....
 
 
The pie went in the oven, baked, and then came out and cooled.  I was actually amazed at how this pie turned out.  First of all, I was just excited how it looked (again, for my first dough pie ever), and then the taste.  The crust was flaky and buttery, and the filling had the perfect combination of sweet and sour.  This recipe was definitely one of the more challenging I had faced so far, mainly because it was all completely brand new to me.  However, I will say that I completely enjoyed making this, and I think I will be looking forward to trying other types of pies.  How, one last statement - My mom makes an amazing cherry pie, but I would definitely say this mine has to be a close second! 


May 28, 2013 - Lemon-Blueberry Scones

I had a pretty long baking break for a week (second wedding of the summer, and this one required some traveling), but when I was flipping through the book I came across the recipe and various variations for Cream Scones.  After looking at the process, I looked in the freezer and noticed I had some frozen blueberries handy, so I decided to make the Lemon-Blueberry Scones.


I had never made anything even remotely close to a scone, so this was a totally new experience for me.  I mixed the dough up relatively quickly, and then came the forming process.


I actually ended up using a spring form pan with a removable bottom.  After pressing the dough into the bottom of the pan, I removed the sides and there was a perfect circle of dough.


Then I used a bench scraper to slice the dough into 8 wedges.  After that, it was baking time.


After the scones cooled it was time to try one.  Wow.  I can also honestly say I could probably count on one hand the number of times I had even eaten a scone, but I can tell you now I will be eating them more often!  Basically, they reminded me of a flaky, sweeter biscuit with added components in the lemon zest and blueberry.  These were a hit with the family, and as you will see in a minute it wasn't long before I made another variation.

May 22, 2013 - Banana Bread

Here we go playing catch up again.  I have quite a few recipes to get caught up on tonight, but I am going to stay consistent with putting them in the order they were made.  I promise, from now on I will try to do better staying caught up with myself.  But for now, up first is Banana Bread.


This was one of those situations where I literally had 3 or 4 really really ripe bananas that needed to be either used for something or tossed pretty soon.  So of course I thought, I'm sure I can come up with something to bake.  Obviously that something was banana bread.  This recipe came from the quick breads chapter and it was pretty much just that....quick.  Not only was this the very first recipe in the book, but it was a quick batter to mix up.  I added the walnuts (because I personally like walnuts in banana bread), and mixed the other ingredients together and into the oven it went.


As would be expected, the bread turned out great.  It was the perfect density without being overly heavy, and had a great banana flavor with those walnuts just giving it the perfect slight nutty flavor.  Definitely a great recipe if you want to whip up a sweet bread quick.